
uniapp的ios证书怎么申请 请看这个文档
iOS有两种证书和描述文件:
| 证书类型 | 使用场景 |
|---|---|
| 开发(Development)证书和描述文件 | 用于开发测试,在 HBuilderX 中打包后可在真机环境通过Safari调试 |
| 发布(Distribution)证书和描述文件 | 用于提交 AppStore,在 HBuilderX 中提交云打包后提交到 AppStore 审核发布 |
准备环境
- 必需要有苹果开发者账号,并且加入了 “iOS Developer Program”
- Mac OS 10.9以上系统(如果已经申请p12证书则不需要)
登录 iOS Dev Center
打开网站 iOS Dev Center
使用苹果开发者账号登录 iOS Dev Center:
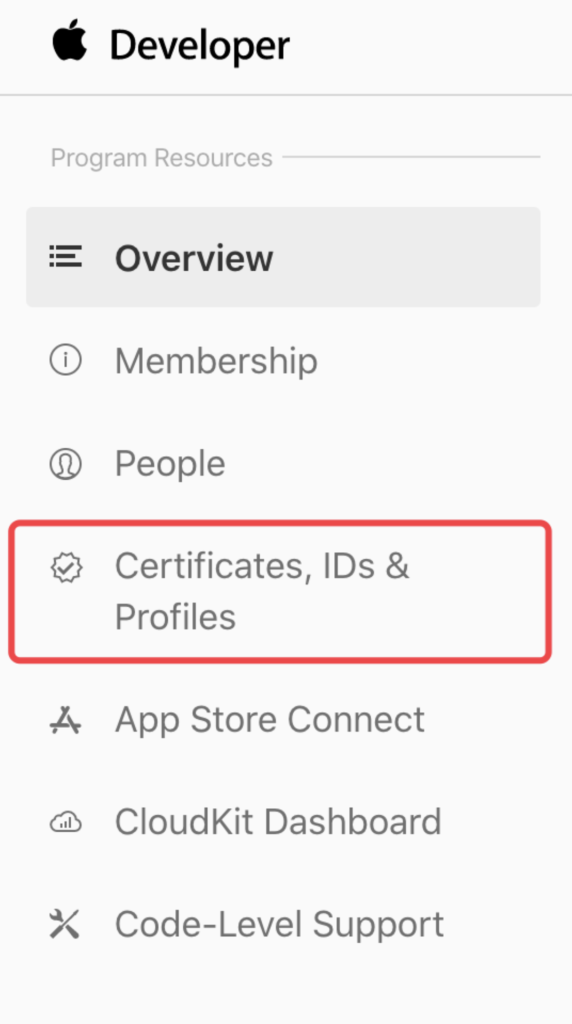
登录成功后在页面左侧选择 “Certificates,IDs & Profiles” 进入证书管理页面:
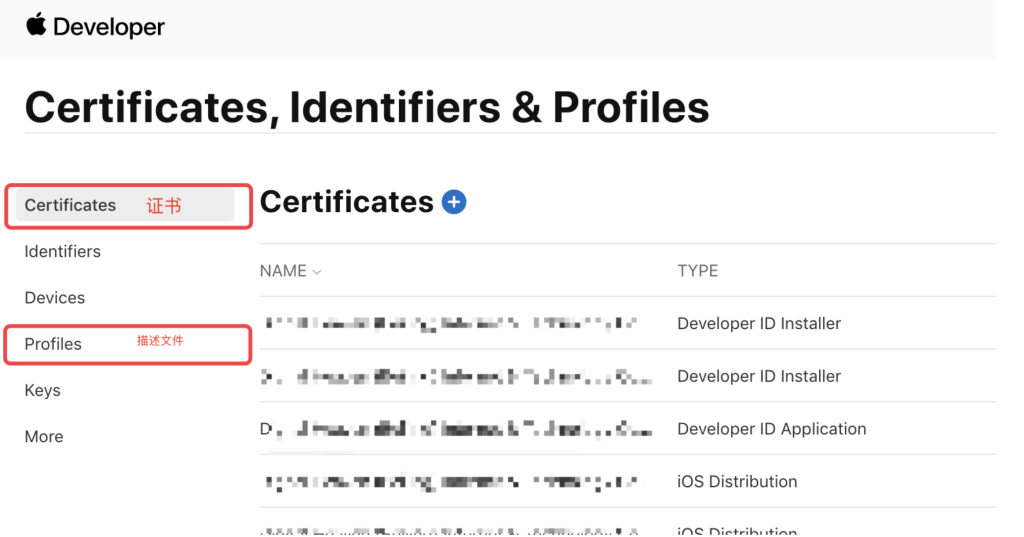
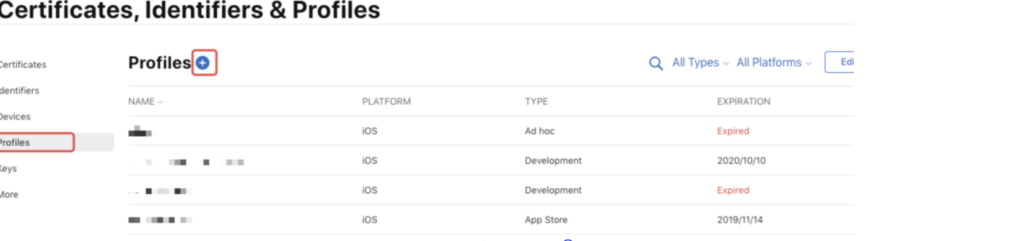
在证书管理页面,可以看到所有已经申请的证书及描述文件:
下面我们从头开始学习一下如何申请开发证书、发布证书及相对应的描述文件。
首先需要申请苹果 App ID (App的唯一标识)
如果已经申请,可跳过此节
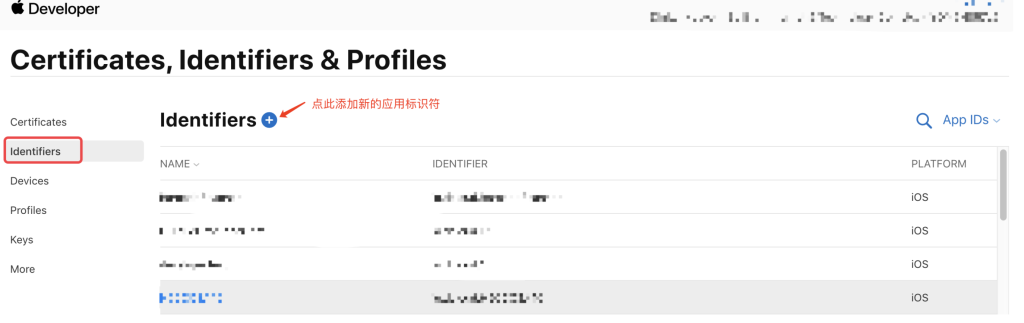
选择页面的 “Identifiers” 可查看到已申请的所有 App 应用标识,点击页面上的加号来创建一个新的应用标识:
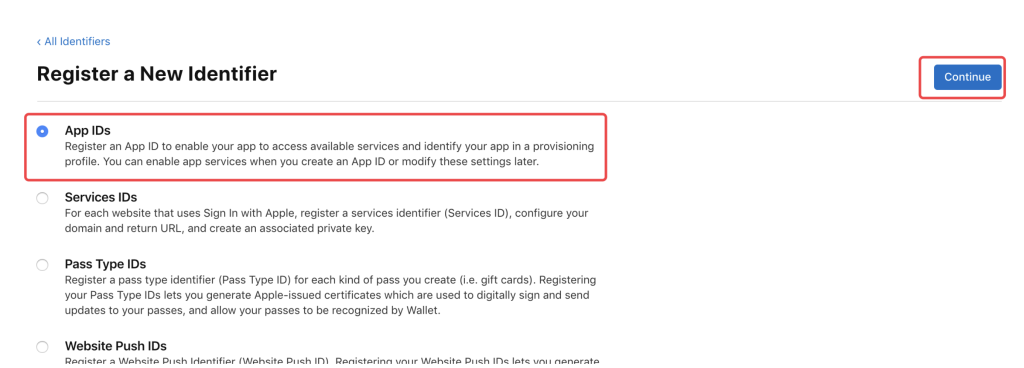
选择标识类型为 “App IDs”,然后点击 “Continue”
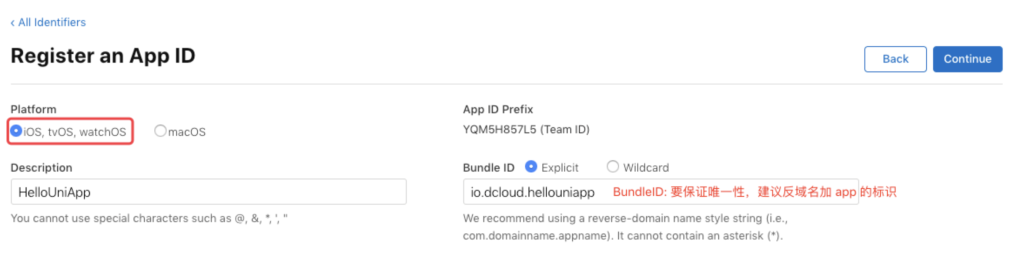
平台选择 “iOS,tvOS,watchOS”,Bundle ID 选择 “Explicit”,在 Description 中填写描述,然后填写 Bundle ID,Bundle ID 要保持唯一性,建议填写反域名加应用标识的格式 如:“io.dcloud.hellouniapp”, 然后点击 “Continue”
注意:在 HBuilderX 中 App 提交云端打包时界面上的 AppID 栏填写的就是这个 Bundle ID
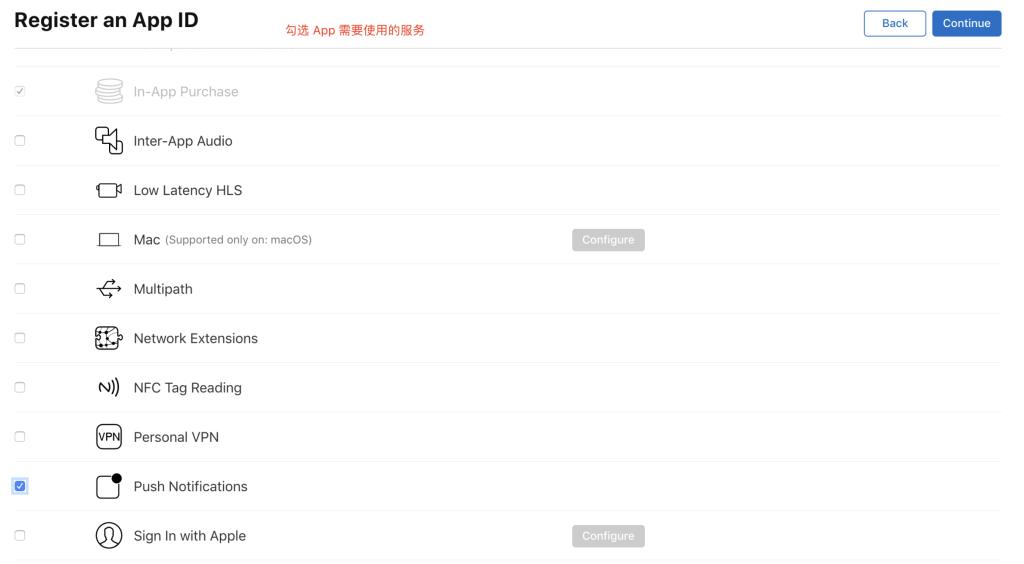
接下来需要选择应用需要使用的服务(如需要使用到消息推送功能,则选择“Push Notifications”),然后点击 “Continue”
注意:如果App用不到的服务一定不要勾选,以免响应审核
确认后选择提交,回到 identifiers 页面即可看到刚创建的App ID:

至此,App ID 已经创建完毕,接下来开始创建开发证书,在创建开发证书前,需要先生成证书请求文件
生成证书请求文件
不管是申请开发 (Development) 证书还是发布 (Distribution) 证书,都需要使用证书请求 (.certSigningRequest) 文件,证书请求文件需在Mac OS上使用 “钥匙串访问” 工具生成。
在“Spltlight Search”中搜索“钥匙串”并打开 “钥匙串访问” 工具:
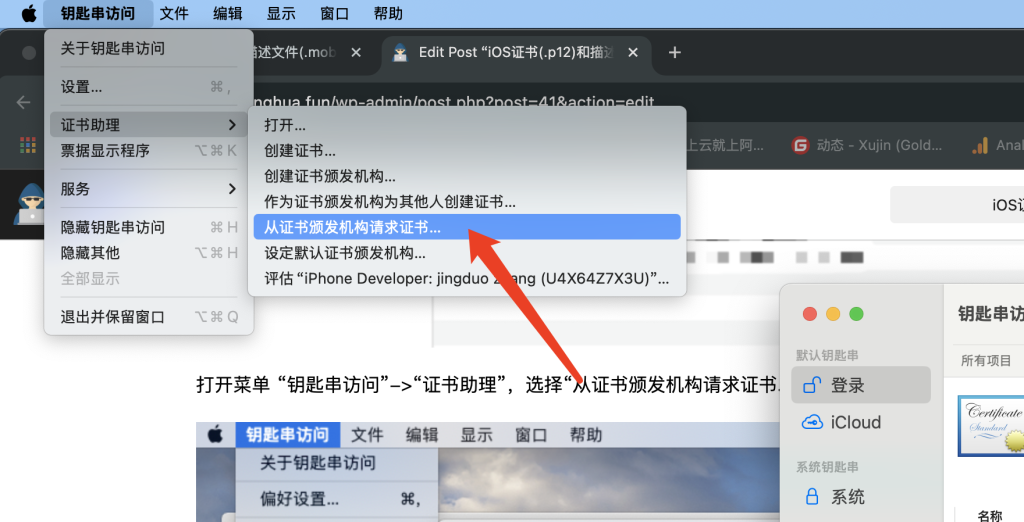
打开菜单 “钥匙串访问”->“证书助理”,选择“从证书颁发机构请求证书…”:
打开创建请求证书页面,在页面中输入用户邮件地址、常用名称,选择存储到磁盘,点击 “继续” :注意 红色箭头也要钩上
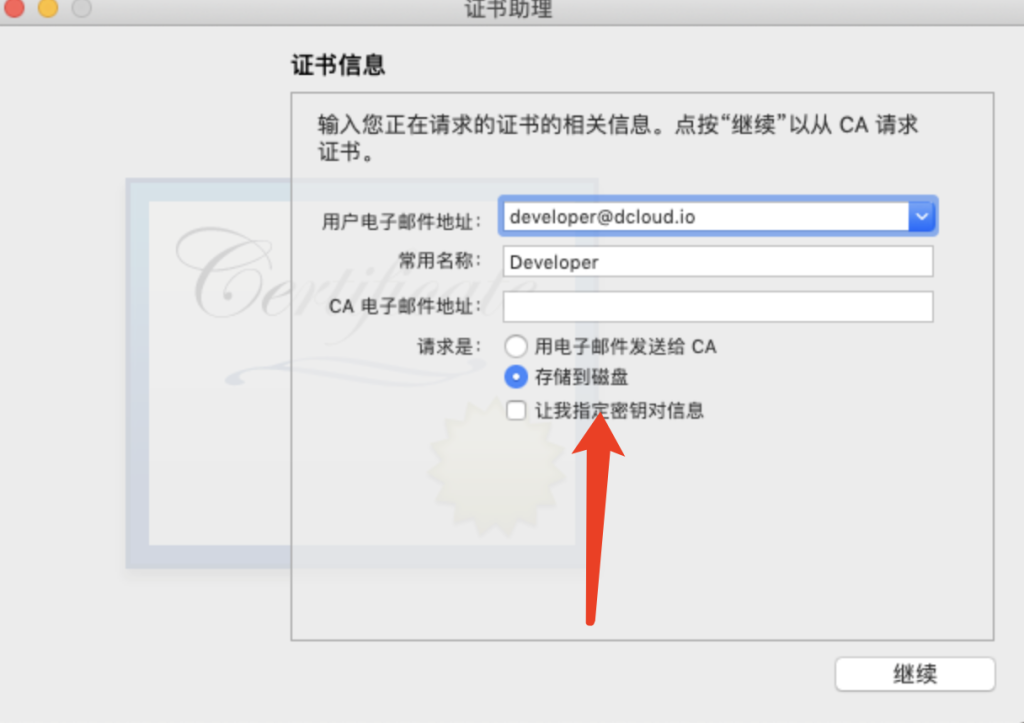
文件名称为“CertificateSigningRequest.certSigningRequest”,选择保存位置,点击 “存储” 将证书请求文件保存到指定路径下,后面申请开发(Development)证书和发布(Production)证书时需要用到
申请开发(Development)证书和描述文件
开发(Development)证书及对应的描述文件用于开发阶段使用,可以直接将 App 安装到手机上,一个描述文件最多绑定100台测试设备(开发证书不能用于发布应用到 App Store)。
申请开发(Development)证书
在证书管理页面选择 “Certificates” 可查看到已申请的所有证书(TYPE:Development 为开发证书,Distribution为发布证书),点击页面的加号来创建一个新的证书:

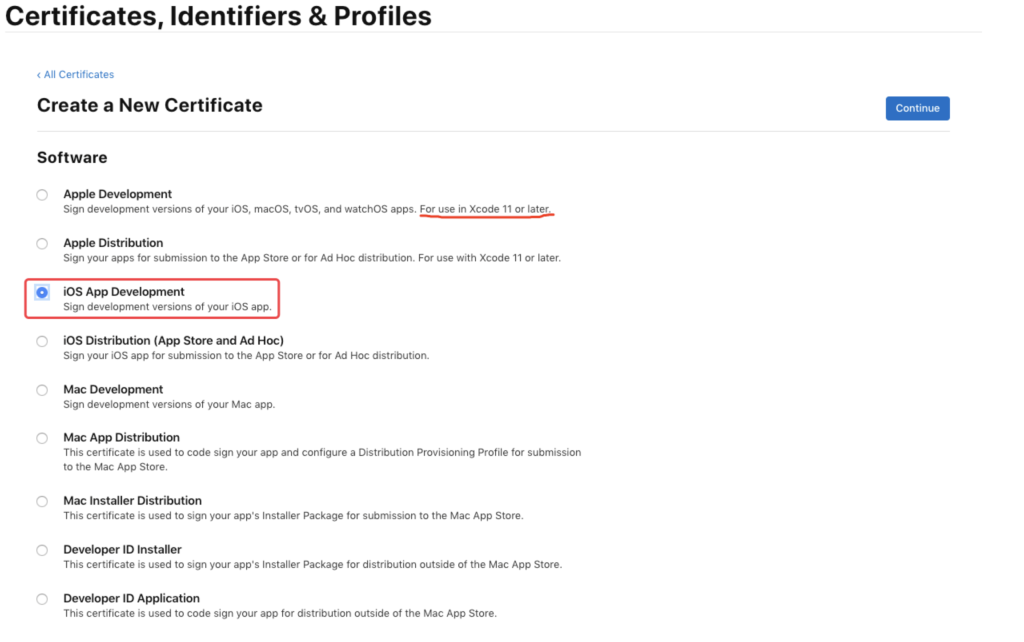
在 “Software” 栏下选中 “iOS App Development” 然后点击 “Continue”:
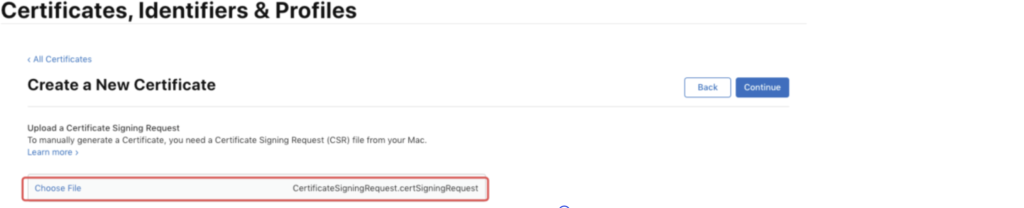
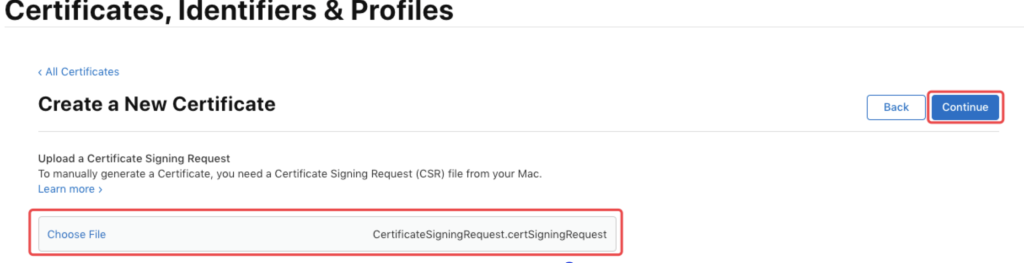
接下来需要用到刚刚生成的证书请求文件,点击“Choose File…”选择刚刚保存到本地的 “CertificateSigningRequest.certSigningRequest”文件,点击 “Continue” 生成证书文件:
生成证书后选择 “Download” 将证书下到本地 (ios_development.cer):

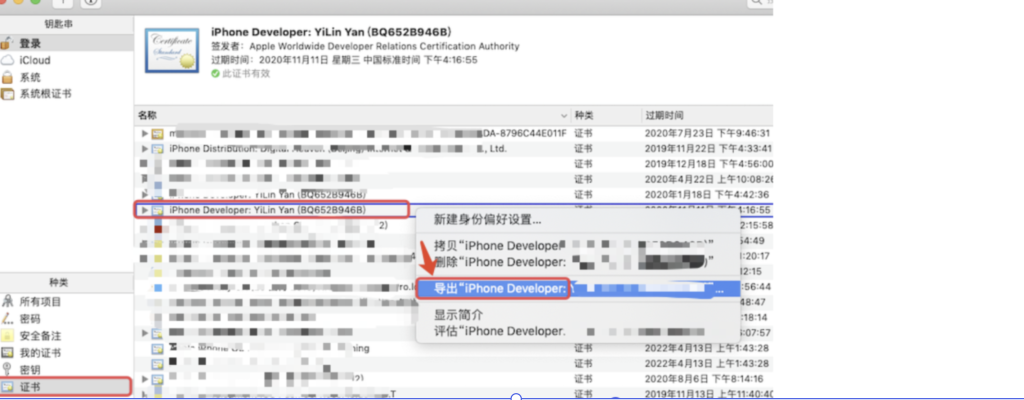
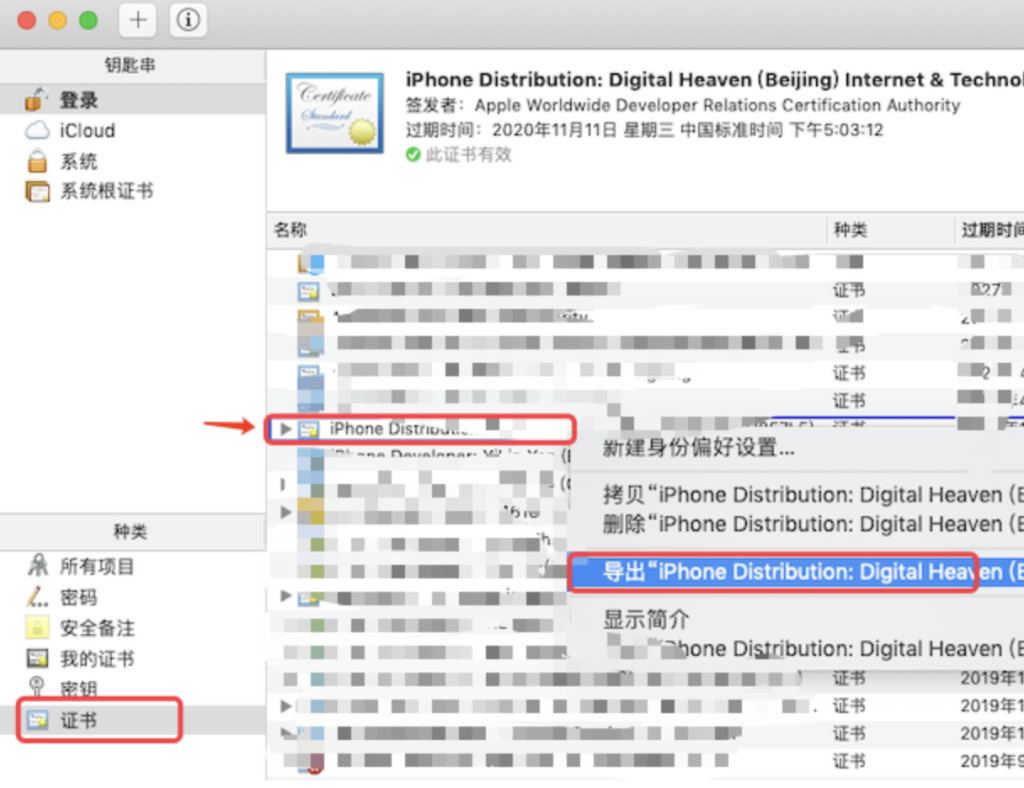
双击保存到本地的 ios_development.cer 文件,会自动打开 “钥匙串访问” 工具说明导入证书成功,可以在证书列表中看到刚刚导入的证书,接下来需要导出 .p12 证书文件,选中导入的证书,右键选择 “导出…”:
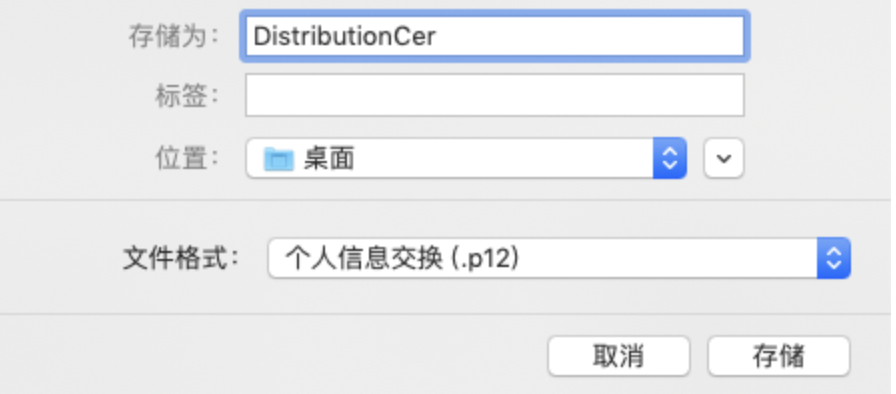
输入文件名、选择路径后点击 “存储”: 如果没有p12的文件格式 把钥匙串选项卡点击到我的证书页面
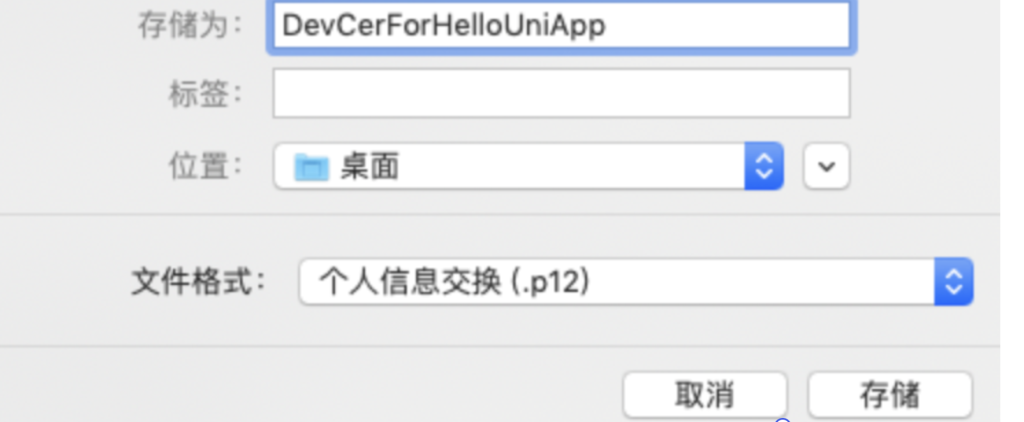
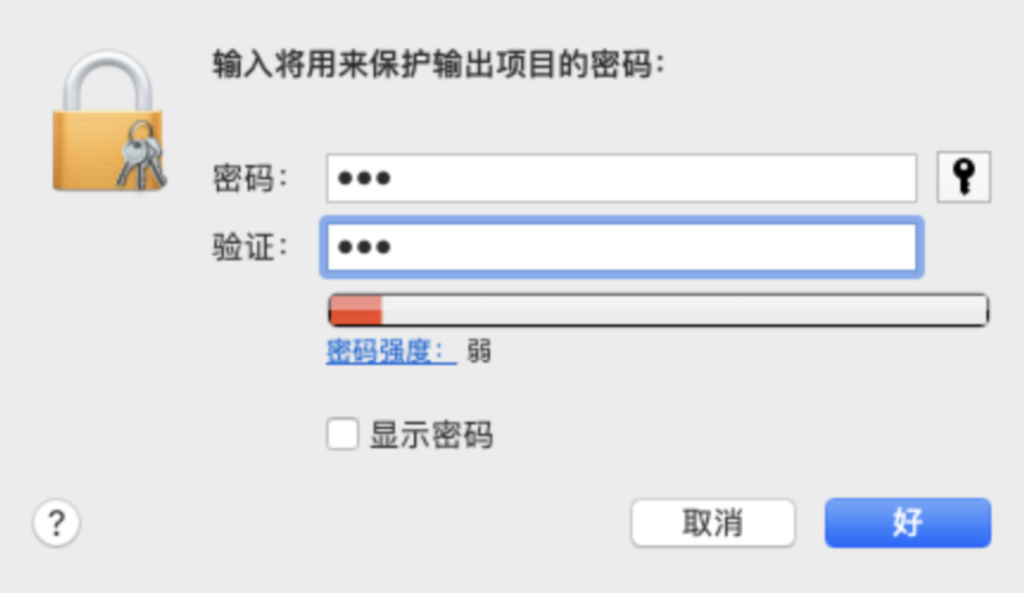
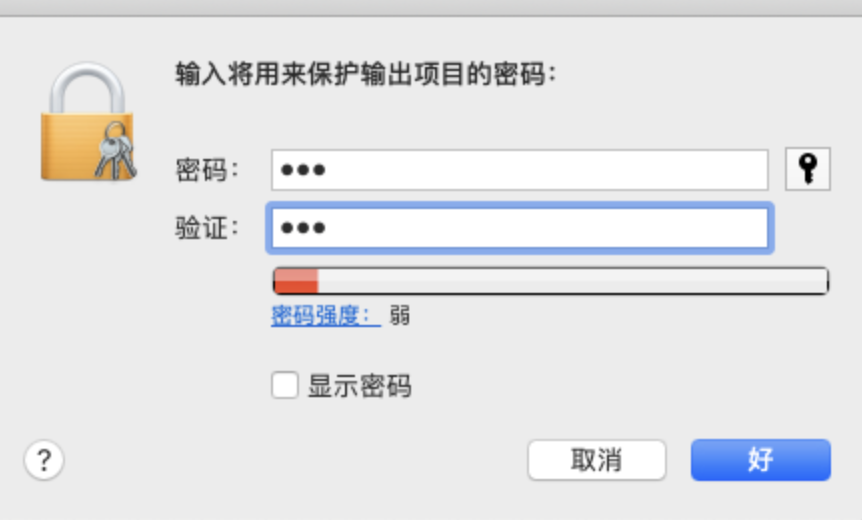
输入密码及确认密码后点击 “好”:
至此,我们已经完成了开发证书的制作(得到了 xxx.p12 证书文件),接下来,继续生成开发阶段所需的描述文件,在生成描述文件之前,需要先添加调试设备(iPhone 、iPad)
添加调试设备
开发描述文件必须绑定调试设备,只有授权的设备才可以直接安装 App,所以在申请开发描述文件之前,先添加调试的设备。
(如果已经添加设备,可跳过此节)
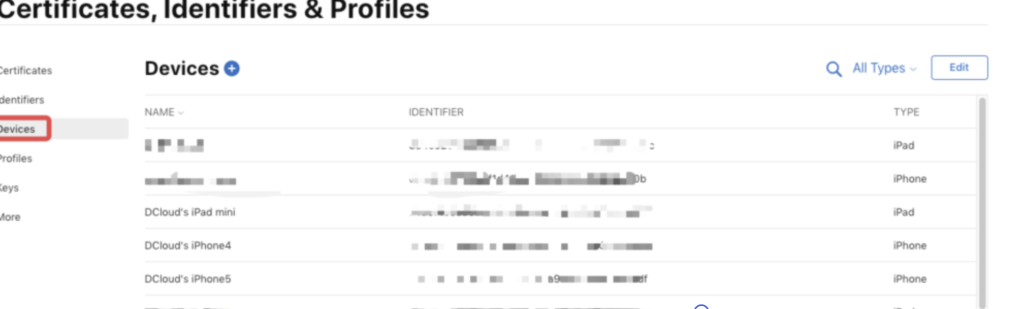
在证书管理页面选择 “Devices”,可查看到已添加的所有设备信息,点击页面上的加号来添加一个新设备:
填写设备名称 和 UDID(设备标识):
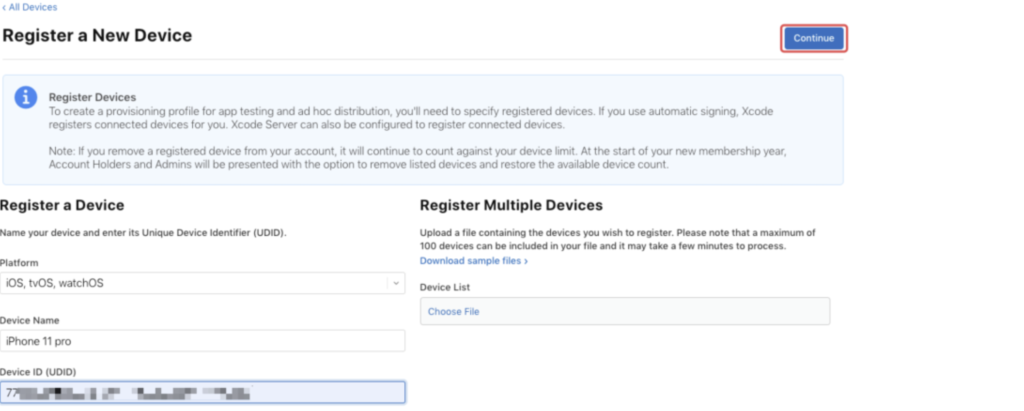
获取设备UDID方法,将设备连接到电脑,启动 iTunes,点击此区域可切换显示设备的 UDID,右键选择复制
输入完成后,点击“Continue” 继续完成添加即可;
接下来继续申请描述文件
申请开发 (Development) 描述文件
在证书管理页面选择 “Profiles”,可查看到已申请的所有描述文件,点击页面上的加号来添加一个新的描述文件:
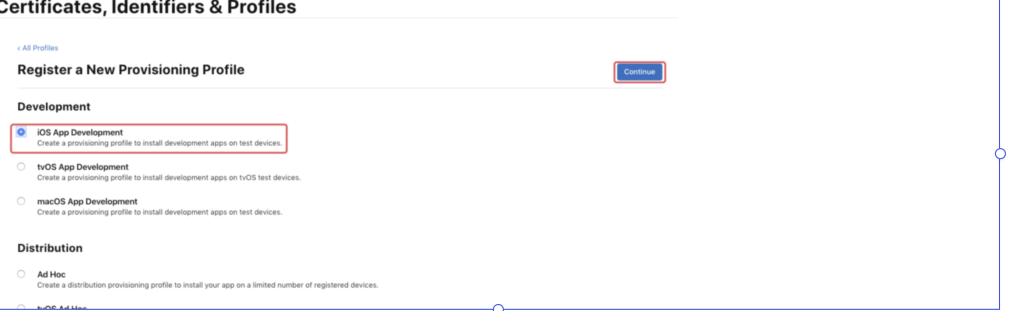
在 “Development” 栏下选中 “iOS App Development”,点击“Continue”按钮:
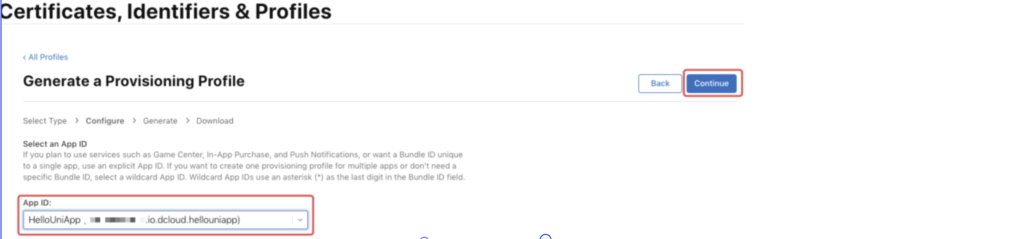
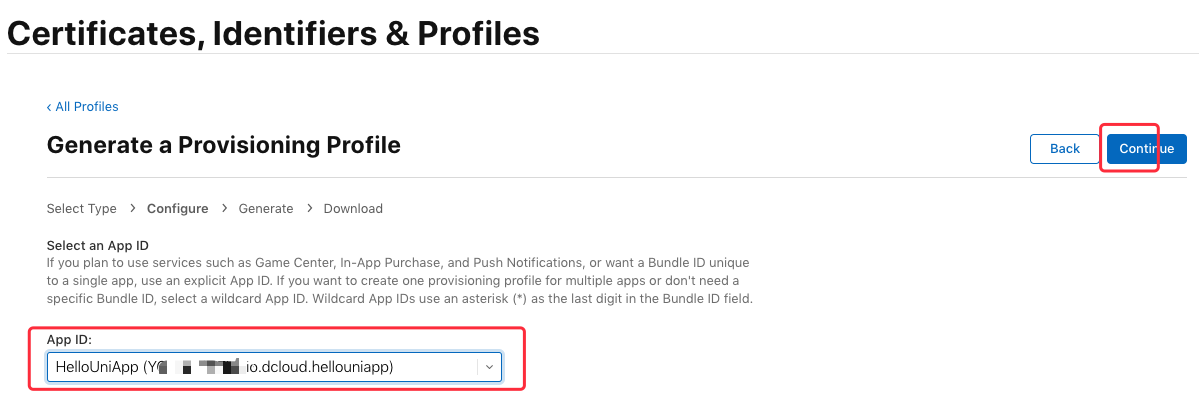
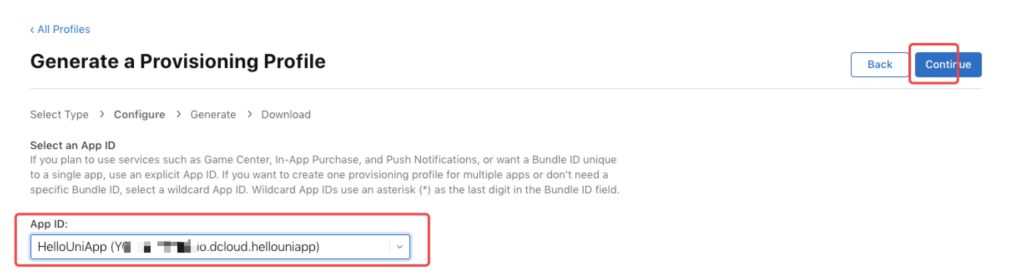
这里要选择之前创建的 “App ID” (这里是“io.dcloud.hellouniapp”),点击“Continue”:
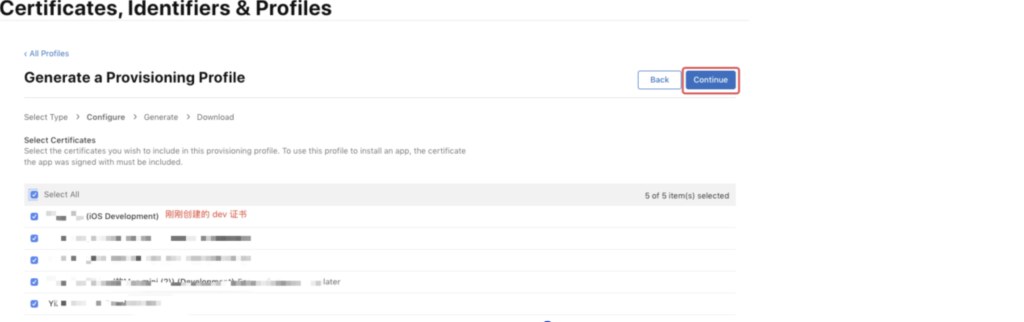
接下来选择需要绑定的证书,这里建议直接勾选 “Select All”,点击“Continue”:
选择授权调试设备,这里建议直接勾选 “Select All”,点击 “Continue”:

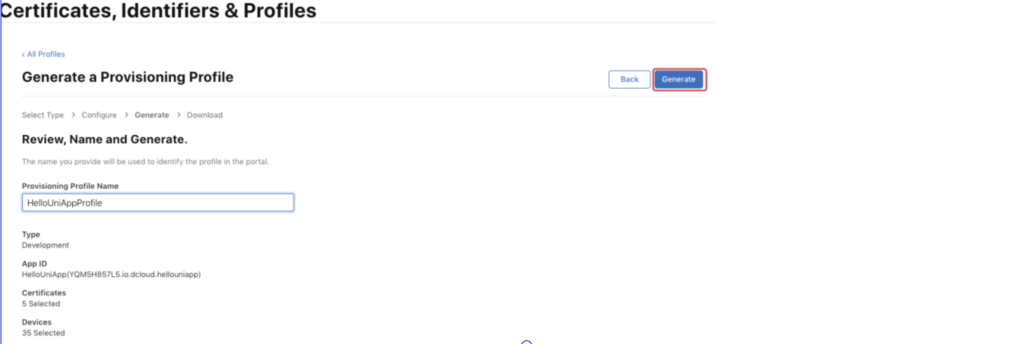
输入描述文件的名称(如“HelloUniAppProfile”), 点击 “Generate” 生成描述文件:
点击“Download”下载保存开发描述文件(文件后缀为 .mobileprovision)
至此,我们已经得到了开发证书(.p12)及对应的描述文件(.mobileprovision),接下看一下如何制作发布证书及发布描述文件
申请发布(Distribution)证书和描述文件
发布 (Production) 证书用于正式发布环境下使用,用于提交到Appstore审核发布。发布证书打包的 ipa,不可以直接安装到手机上
申请发布(Production)证书
在证书管理页面选择 “Certificates” 可查看到已申请的所有证书(TYPE:Development 为开发证书,Distribution为发布证书),点击页面的加号来创建一个新的证书:

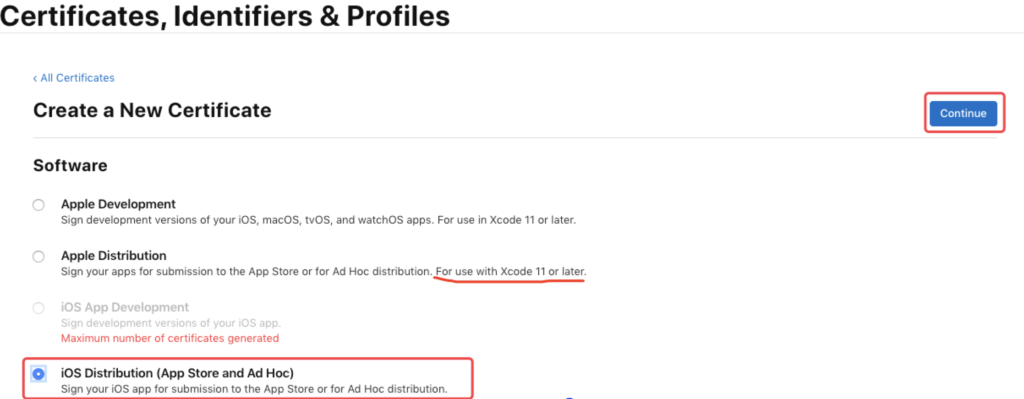
在 “Software” 栏下选中 “App Store and Ad Hoc”,点击 “Continue”:
接下来同样需要用到之前生成的证书请求文件,点击“Choose File…”选择刚刚保存到本地的 “CertificateSigningRequest.certSigningRequest”文件,点击 “Continue” 生成证书文件:
生成证书成功,选择“Download” 将证书下载到本地 (ios_production.cer):

同样双击保存到本地的 ios_production.cer 文件将证书导入到 “钥匙串访问”工具中,可以在证书列表中看到刚刚导入的证书,接下来需要导出 .p12 证书文件,选中导入的证书,右键选择 “导出…”:
输入文件名、选择路径后点击 “存储”:
输入密码及确认密码后点击 “好”:
至此,我们已经完成了发布证书的制作(得到了 xxx.p12 证书文件),接下来,继续生成发布描述文件
申请发布 (Distribution) 描述文件
在证书管理页面选择 “Profiles”,可查看到已申请的所有描述文件,点击页面上的加号来添加一个新的描述文件:
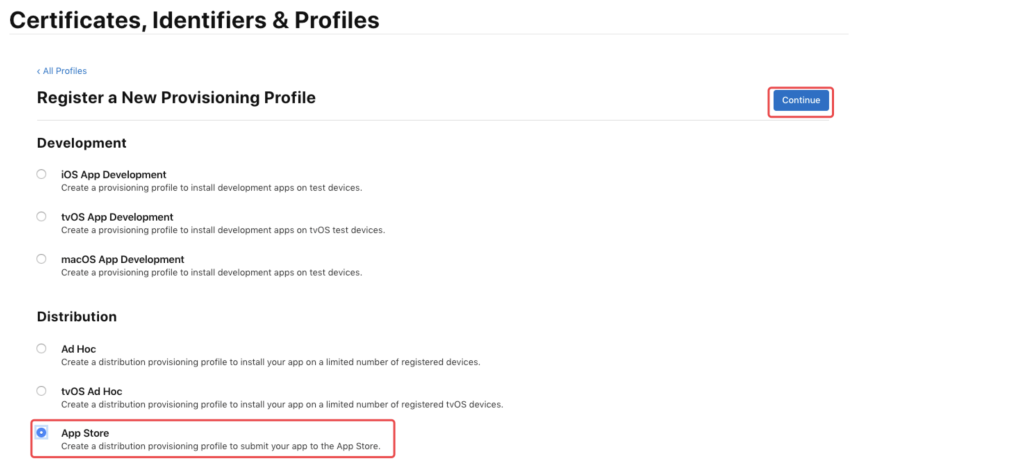
在 “Distribution” 栏下选中 “App Store”,点击“Continue”按钮:
这里要选择之前创建的 “App ID” (这里是“io.dcloud.hellouniapp”),点击“Continue”:
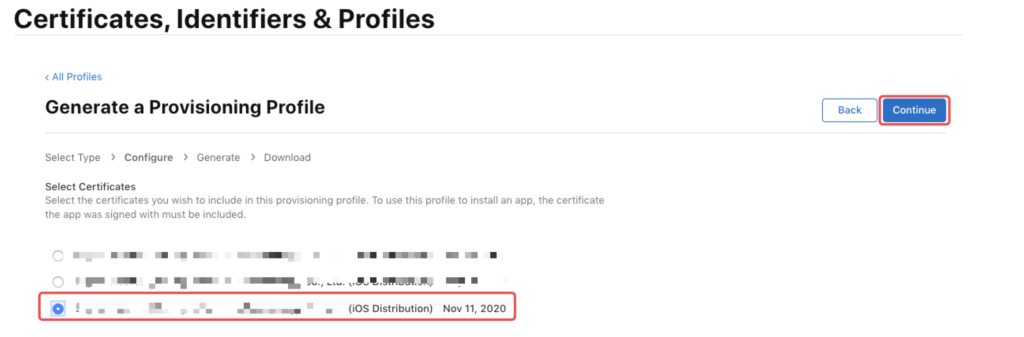
接下来选择需要绑定的发布证书(iOS Distribution),这里勾选刚刚生成的发布证书”,点击“Continue”:
接下来输入描述文件的名称(如“HelloUniAppProfileDistribution”), 点击 “Generate” 生成描述文件:

然后点击 “Download” 将描述文件下载到本地(文件后缀为 .mobileprovision)
至此,我们已经得到了发布证书(.p12)及对应的发布描述文件(.mobileprovision)